
PRESERVING SPRING
Jams, Jelly & Preserves - Oh, My!, Pickles and Spring Cleaning, too!

CANNING 101
I’ve recently become obsessed with preparing preserved goods. I find the act of making a batch of jam both relaxing and rewarding. When making preserved goods, purchase produce that is in season. Not only will it be abundant, it will be cheaper and at the height of its flavor.
You’ll notice that I use added pectin in my recipes. I do so for multiple reasons. The main being that using it simplifies the process. To make jam without added pectin, you have to cook down the fruit until the pectin naturally present in the fruit sets. Not only is this time consuming (and a bit tricky), but the extended cooking time causes the fruit to caramelize and it loses that “just picked” flavor. Also, the yield is less since you are cooking down the fruit so much.
The yield of each batch is depicted in ounces. When I can, I like to make an assortment of sizes - typically 4 and 8 ounce jars. Use the batch size to determine how many jars you need to prepare and always prep one more than you think you need - just in case!
TIP: If you do not prepare enough jars, or simply run out, any extra jam can be stored in a plastic container in the refrigerator for a couple of months or so.
PLAY IT SAFE
When preserving, one should follow some precautionary steps to ensure a safe final product. Here are a few things you need to know:
1. Sanitize all tools, jars and equipment - specifically any vessel that comes into contact with the finished jam. Use tools that are heat-resistant and boil in hot water for 10 minutes or sanitize in a dish washer. Allow all items to air dry before using. Screw caps and jar lids do not need to be boiled. Just give them a good cleaning with some soapy warm water. Boiling the lids may damage them and prevent them from properly sealing.
2. Processing the cans is a must. The jars are boiled in water to kill various molds and bacteria that may be present. This step also removes the oxygen in the jars, creating an airtight seal. Do not be tempted to over-process the cans which will cause the jam to further caramelize.
3. Be sure to use a tested recipe from a reliable source. While it may seem like you can easily interchange ingredients (and usually you can), it is important that the ingredients have a similar pH. This is where science kicks in. Unfortunately, the boiling-water processing doesn’t kill all harmful bacteria. Botulism spores are capable of germinating in these conditions. However, they can only be harmful in preserved foods low in acidity. Long story short, you can only preserve items that are considered to be high in acid, with a pH of 4.6 or below. Many fruits meet that standard, however there are some that are at the border or even considered to be low in acid. To compensate, lemon juice or citric acid are typically added. You can purchase pH testing strips so that you can double check the acidity level. See the link below!
4. After you process the jars, allow them to cool, without movement for a few hours or overnight. Be sure to examine each jar, checking that all of the lids are concave, ensuring a vacuum seal. If a jar or two did not process correctly, don’t fret - just store it in the refrigerator for up to a few months.
TIP: It is crucial that you leave the correct amount of headspace in each jar and that the rims are clean in order for the processing to work and the lids to fully seal.
5. Date your jars and store in a dark, cool area. While they have a very long shelf life, they are best when consumed within a year or two, and be sure to refrigerate after opening!
EQUIPMENT & TOOLS
One of the best parts of canning is that you do not need a ton of equipment or tools - and you probably already have most of it in your cabinets, the first of which is a stock pot. It just needs to be something wide enough to contain up to 8 jars and tall enough that the water can cover the jars by an inch or so.
Canning Jars
If you want your preserves to be shelf stable, using canning jars is a must. They come with lid tops that are specially manufactured to create an airtight seal and a screw cap which keeps the lids in place during the sealing process. If you’re not concerned with your finished product being shelf stable, you can use any container with a lid that you’ll just throw straight into the refrigerator. I often use an assortment of different sized jars, but 8-ounce is a great starting point. While the jars and screw tops are reusable, you’ll need to use a new lid every time you want to seal your jars. Good news - they’re sold separately! https://amzn.to/4uPjDxx
Canning Jar Lifter
This tool makes easy work of transferring canning jars into and out of the boiling water when processing. Truth be told, I use a standard set of tongs, BUT it is precarious. If you do not have a death grip on the jar, it can easily slip from the tongs and wind up falling back into the water and splashing you or dropping onto the stove, counter or floor, sending molten hot jam everywhere. Don’t say I didn’t warn you! https://amzn.to/4c1loiD
Canning Jar Funnel
This is another one of those tools that just makes life easier, but is not necessary. When canning, you want to make sure that the rim of the jars are clean and bone dry before placing the lid on top otherwise they may not seal. This tool helps keep the rims clean and allows you to ladle the hot jam into the jars with ease. https://amzn.to/4szbPyf
Silicone Measuring Cups
I’m adding this tool because, not only do I use them religiously, but because this is what I use to transfer the finished jam to the canning jars. I simply pour the jam into the cup and then transfer it into the jars. Because it’s made of silicone, you can gently squeeze the sides of the cup to easily control the stream and keep the jam from splashing or spilling onto the rim. https://amzn.to/4d1UkBW
High-Sided Skillet
While you can easily use another large saucepan or a copper jam pot, I prefer a high-sided skillet. This is another piece of equipment that practically lives on my stove. The higher, unsloped sides help keep whatever you’re stirring or mixing stay in the pot. This is what I have at home… https://amzn.to/4sTv8SE
ph Test Strips
If you find yourself really getting into canning and get to the point where you’d like to begin to develop your own recipes, you can purchase test strips so that you can test the ph of your concoctions to make sure they are food safe! https://amzn.to/4cwZYLm
*This post contains affiliate links. If you click and make a purchase, I may earn a small commission at no extra cost to you.
CITRUS-KISSED STRAWBERRY JAM
With strawberry season just around the corner (assuming you live in the Northeast), here’s a perfect starter recipe for you to try!
NOT JUST FOR TOAST
Listen, while there’s nothing wrong with using jam, jelly or preserves as a spread on toast or in a PB&J, there’s so much more you can you do with it!
Use it to add a fruity sweetness to your vinaigrettes, dressings and marinades.
Level up your cocktails by adding some jam to that shaker before giving it a good mix.
Add a splash of water to some jelly, warm it up and mix until it’s dissolved to use as a glaze for fruit topped baked goods.
Use it to add a burst of fruity flavor to your baked goods like thumbprint cookies or bars.


Pistachio Thumbprint Cookies - get the recipe HERE!
Sour Cherry Pistachio Bars - get the recipe HERE!
Jelly-Filled Italian Butter Sandwich Cookies - get the recipe HERE!
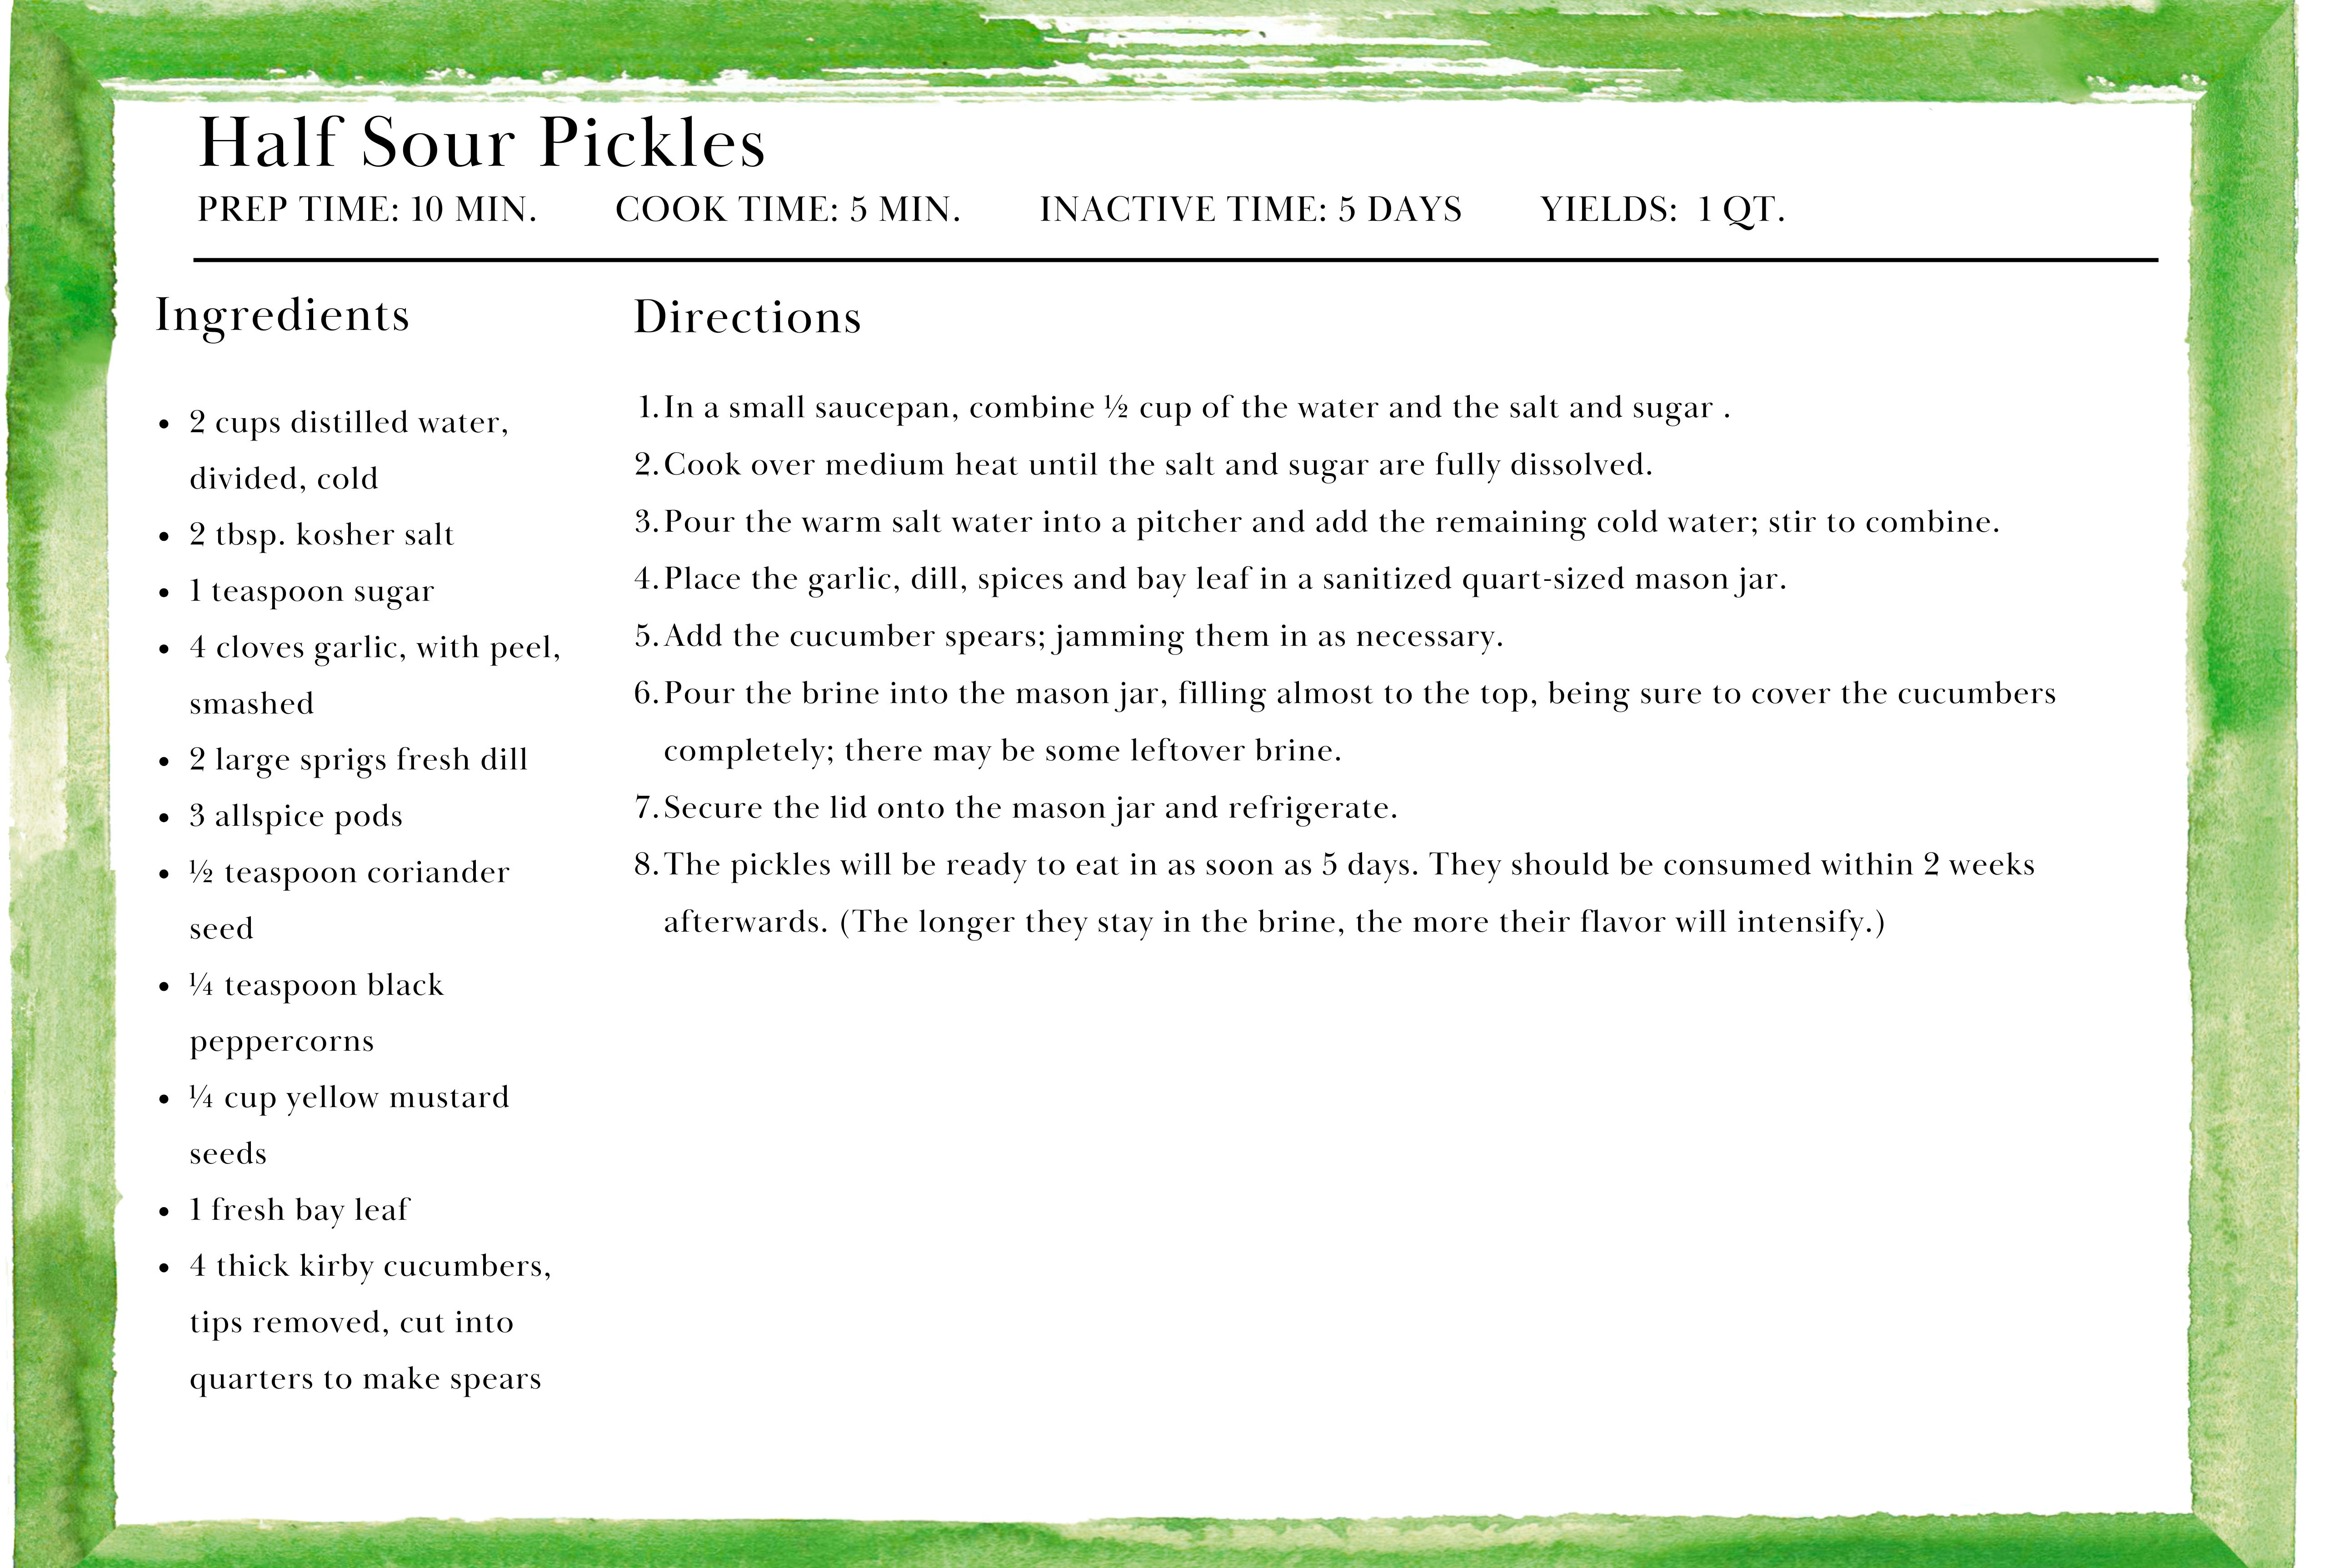
IN A PICKLE…
Another way to preserve food is through fermentation. If I’m being honest, I’m not usually a huge fan of fermented foods, but the one exception is half-sour pickles. I make them throughout the spring and summer, picking up Kirby pickles when I visit Delicious Orchards, one of my favorite farm stores in South New Jersey. They are so easy to make, but they do need time to ferment. The longer they sit in the fridge, the more potent the flavor. To keep the pickles nice and crunchy, a cool brine is used and these bad boys are stored in the fridge!
SPRING CLEANING
If you’ve been here since the beginning, you may have noticed that I’m a clean freak. In January I shared my tips for Winter Reset, so now that it’s April, it’s only fitting that I share my spring cleaning tasks.
CLEAN THE OVEN: I’m not going to say I enjoy doing this, but after relying on my oven all fall and winter, it’s time for a glow up. This is the ONLY thing I am doing that day as it takes every ounce of my sanity to get the job done. I don’t really have a true and tried way, but I do tend to use Dawn Power Spray to help break down built up grease and grime.
CLEAN UNDER OVEN & FRIDGE: I try to do this every six months. You wouldn’t believe how dusty things get under there! Thankfully, in my apartment, both of these appliances are easy to pull out and have long electrical cords, plumbing and gas lines. If this is your first time pulling them out, do so slowly and carefully, making sure that you aren’t pulling at any lines from the appliance to the wall. Once out, I give the area a good vacuum, wipe down the walls (and sides and backsides of the appliances) with a Swiffer duster and or/ with Windex, vacuum again, then steam the floors before carefully pushing the appliances back into place.
DUST CABINET TOPS: This is another task that I could live without, but it has to be done. If you have a gap between your cabinet tops and ceiling, it’s time to suck it up and dust up there. I use the vacuum with a brush attachment to remove all the dust, and then wipe down the upper moldings with wood cleaner. Be sure to use the appropriate cleaner based on what your cabinets are made of!
CLEAN CABINET INTERIORS: In the winter when I clean out my pantry, I wipe down those cabinets, so all I really have left to do in the spring are the cabinets that house my pots, pans, plates and glasses. Put on some good music or a podcast, and wipe away. It doesn’t take as long as you think, especially if your kitchen is as small as mine!
CLEAN BEDROOM CLOSET, FRONT ENTRY CLOSET AND BATHROOM VANITY: Since this is mostly a food blog, I am not going to go too deep into these, but I do this every spring. I don’t do all three of these locations on the same day, but try to tackle them within a week or so. I clear and wipe down all the shelves, cabinets, drawers and storage areas before organizing everything that lives in these spaces. This is the time to (properly) discard expired or old medications/prescriptions, donate clothes that you no longer need or wear as well as items you’ve accumulated that are no longer necessary, and throw out some junk!